Gradle Share

1.gradle概念
groovy基本语法
gradle、project、task
gradlew gradle wrapper
插件 plugin 概念、作用

2.gradle命令
clean
bulid
tasks(Android Studio查看)

https://github.com/tfnico/vim-gradle
让vim能识别gradle语法

feature
1.Executing multiple tasks 执行多个task,每个只执行一次
gradle task1 task2
2.Excluding tasks 可以排除某个task不执行
gradle task2 -x task1
task2 dependent task1
3.Continuing the build when a failure occurs 忽略错误继续执行
可能出现其它问题
4.Task name abbreviation
gradle本身可以识别缩写
如执行task wangzuliang
gradle wzl
5.Selecting which build to execute
可以把文件当成参数传递
gradle -b zuliangwang/file1 task1
6.Forcing tasks to execute
自带增量编译 gradle sdk里提供的task大部分都能增量编译
每次 gradle task1 只编译增量部分
7.gradle自带一些编译时工具帮助分析
详细
https://docs.gradle.org/current/userguide/project_reports_plugin.html

  1. Dry Run
    类似打Log观察生命周期,不执行task中的代码,仅显示执行顺序
    gradle -m task1

3.build.gradle setting.gralde
常见属性分析
看懂Android Projecct中的build.gradle
Porject:settings.gradle和build.gradle
task的执行顺序

4.
gradle脚本书写
task simpleTask << {

}

gradle blog
http://www.infoq.com/cn/articles/android-in-depth-gradle?utm_source=infoq&utm_medium=related_content_link&utm_campaign=relatedContent_articles_clk

https://segmentfault.com/a/1190000004234712?_ea=538654

gradle官方文档
https://docs.gradle.org/current/userguide/overview.html
不仅仅是android
web js java app
核心 build your project

Groovy
Gradle’s build scripts are written in Groovy, not XML. But unlike other approaches this is not for simply exposing the raw scripting power of a dynamic language. That would just lead to a very difficult to maintain build. The whole design of Gradle is oriented towards being used as a language, not as a rigid framework. And Groovy is our glue that allows you to tell your individual story with the abstractions Gradle (or you) provide. Gradle provides some standard stories but they are not privileged in any form. This is for us a major distinguishing feature compared to other declarative build systems. Our Groovy support is not just sugar coating. The whole Gradle API is fully Groovy-ized. Adding Groovy results in an enjoyable and productive experience.

groovy API手册
http://docs.groovy-lang.org/latest/html/groovy-jdk/index-all.html

搬砖要点总结

1.明确需求。

不管在什么情况下,开始任何一个工作前,一定要让PM明确需求,并且约定好,一定不能临时修改或者增加需求。在这次任务的Deadline前,需求只能减少不能增加。

2.修改Bug和新的需求。

不在需求表上的Bug不算Bug,不主动修改没有需求的代码。

3.代码重构和开发进度。

第一次开发时不考虑代码重构,一切以最快实现功能为准,代码重构往往是接盘侠来做,在开发时不能被自己的代码洁癖困住手脚。

4.代码管理。

任何一点小的改动都要及时提交到git,避免自己的代码中出现玄学问题,在出现不能理解但是有效的代码时一定要记得做标记。

5.需求量度。

权衡自己的时间,当自己的需求和搬砖的需求发生冲突时,向老板或者PM说明情况,砖是搬不完的,但是你的精力是有限的,不要把有限的时间投入到无限的搬砖当中。

6.报酬。

为自己的付出索要合理的报酬,没有钱,不干活,钱不够,主动提。

7.认真负责。

不能因为是搬砖就不投入自己的精力,对待每一个项目都要认真,主动积极的和相关人员沟通,保证在合理范畴内的任务内正常完成。

8.拒绝接盘。

发现前任的代码里有重大问题,或者与新的需求冲突时,主动说明情况,绝对不做接盘侠。

9.注释与文档。

很多情况下,搬砖时是不要求有注释和文档的,但是在允许的情况下请留下适当的注释,保护你的下一任接盘侠,也是在保护你自己,我为人人,人人为我,请珍惜每一个愿意写注释的码农。

PopupWindow和Dialog

1.What?

​ 我们在开发时常常会碰到这样一些需求:点击某个按钮时弹出一个对话框和用户交互,或者是在某个时刻弹出一个在所有UI顶层之上的悬浮框。怎么实现这种效果呢?

​ Android为我们提供了PopupWindow和Dialog,正如名字所示,它们就是一类在顶层出现的视图空间。

​ 来看看官方对这两个类的说明。

PopupWindow

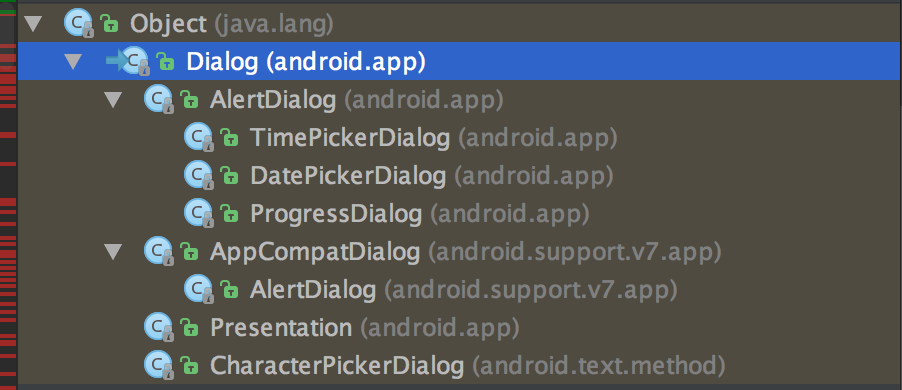
This class represents a popup window that can be used to display an arbitrary view. The popup window is a floating container that appears on top of the current activity.

PopupWindow代表一个可以用于显示任何view的弹出窗口。它是一个出现在当前activity顶层的悬浮的容器。

Dialog

对话框是提示用户作出决定或输入额外信息的小窗口。 对话框不会填充屏幕,通常用于需要用户采取行动才能继续执行的模式事件。

那么这两者有什么区别呢?

注意Dialog的最后一句话:通常用于需要用户采取行动才能继续执行的模式事件。Dialog是阻塞UI线程的,也就是当弹出一个Dialog后,用户必须先处理了Dialog才能继续做其它的事情,而PopupWindow仅仅是一个view的容器,它不会对当前线程造成影响,它是非阻塞的。

另一个重要的区别是:Dialog有固定的位置,它总在屏幕的中央,而PopupWindow没有这个限制,它可以出现在任何地方。

2.How?

下面让我们来看看如何使用PopupWindow和Dialog。

PopupWindow:

使用PopupWindow主要分为两个步骤:

(1)初始化PopupWindow对象,设置contentView、长、宽、是否可以获取焦点等等参数。

(2)显示PopupWindow。

之所以要分为两个阶段,是因为显示是比较重要的问题,前面我们说了PopupWindow与Dialog的不同,正因为PopupWindow可以显示在任意位置,所以如何显示它是需要考虑的,不同于使用Dialog,我们只需要调用dialog.show()就能解决问题,因为dialog的位置固定,这就是灵活性和复杂性的问题,一个东西越灵活,那么使用起来它就一定越复杂。

首先来看初始化PopupWindow。

创建一个PopupWindow对象,可以在构造函数里传一些初始参数,也可以在创建以后以后手动set。

下面是常用的一些初始化操作:

1
2
3
4
5
6
7
8
9
10
11
12
13
final PopupWindow window = new PopupWindow(view, ViewGroup.LayoutParams.MATCH_PARENT, ViewGroup.LayoutParams.WRAP_CONTENT,true);
//设置window本身的高度
window.setWidth(ViewGroup.LayoutParams.WRAP_CONTENT);
//设置window本身的高度
window.setHeight(ViewGroup.LayoutParams.WRAP_CONTENT);
//设置window里的view
window.setContentView();
//设置window背景图片
window.setBackgroundDrawable();
//设置是否能获取焦点 焦点的作用在于按下返回键是否考虑window
window.setFocusable();
//设置能否触摸,参与事件分发
window.setTouchable();

当设置好了window以后就可以来显示它了。

显示PopupWindow的方法有两个:

p1

(1)showAsDropDown

使用这种显示方式,window将会显示在指定的view的左下方,可以自己传入x、y方向的偏移量。

(2)showAtLocation

使用这种显示方式,window将会显示在指定的view的内部,并且以该view的左上角为原点。

Demo就不贴了,几行代码比较简单。

需要注意的是不能直接在Activity的onCreate方法里直接显示PopupWindow,这样会直接报错!这也很好理解,如果你要在开始就显示一个PopupWindow,那么为什么不直接在原来的View里添加呢?

接下来是Dialog。

使用Dialog相比PopupWindow要简单很多。

复杂的是Dialog的继承关系,Google官方的文档上明确的说了不推荐我们直接使用Dialog,而是应该使用它的子类。

下面来看官方说明:

Dialog 类是对话框的基类,但您应该避免直接实例化 Dialog,而是使用下列子类之一:

  • AlertDialog

    此对话框可显示标题、最多三个按钮、可选择项列表或自定义布局。

  • DatePickerDialogTimePickerDialog

    此对话框带有允许用户选择日期或时间的预定义 UI。这些类定义您的对话框的样式和结构,但您应该将 DialogFragment 用作对话框的容器。DialogFragment 类提供您创建对话框和管理其外观所需的所有控件,而不是调用 Dialog 对象上的方法。

    使用 DialogFragment 管理对话框可确保它能正确处理生命周期事件,如用户按“返回”按钮或旋转屏幕时。 此外,DialogFragment 类还允许您将对话框的 UI 作为嵌入式组件在较大 UI 中重复使用,就像传统 Fragment 一样(例如,当您想让对话框 UI 在大屏幕和小屏幕上具有不同外观时)。

    本指南的后文将描述如何将 DialogFragmentAlertDialog 对象结合使用。 如果您想创建一个日期或时间选取器,应改为阅读选取器指南。注:由于 DialogFragment 类最初是通过 Android 3.0(API 级别 11)添加的,因此本文描述的是如何使用支持库附带的 DialogFragment 类。 通过将该库添加到您的应用,您可以在运行 Android 1.6 或更高版本的设备上使用 DialogFragment 以及各种其他 API。如果您的应用支持的最低版本是 API 级别 11 或更高版本,则可使用 DialogFragment 的框架版本,但请注意,本文中的链接适用于支持库 API。 使用支持库时,请确保您导入的是android.support.v4.app.DialogFragment 类,而不是 android.app.DialogFragment

p2

这个图是我直接从Android Studio中查看类继承关系得到的。官方文档里只提到了其中的几个。

每个类具体的说明这里就不说了,需要时再查。

官方文档里说的DialogFragment其实就是一个内嵌了Dialog的Fragment,它不在这个继承树里,使用这个Fragment的好处时结合生命周期对Dialog进行一些处理。

Dialog的使用非常之简单,下面是一个基本的用法:

1
2
3
4
5
6
7
8
9
10
11
12
13
14
15
16
17
18
19
20
21
22
/**
* Created by zuliangwang on 16/12/1.
*/


public class MyDialog extends DialogFragment {


@NonNull
@Override
public Dialog onCreateDialog(Bundle savedInstanceState) {
AlertDialog.Builder builder = new AlertDialog.Builder(getContext());
builder.setMessage("GGSima");
builder.setPositiveButton("hh", new DialogInterface.OnClickListener() {
@Override
public void onClick(DialogInterface dialog, int which) {
Toast.makeText(getContext(),"ttt",Toast.LENGTH_SHORT);
}
});

return builder.create();
}
}

这是一个自定义的简单Dialog,接下来在Activity里使用它。

1
2
MyDialog myDialog = new MyDialog();
myDialog.show(getSupportFragmentManager(),"tag");

就是这么简单。一个show就可以解决所有事情。

本篇到此为止,更多深入的知识在生产环境上再学习。

Binder机制学习

1.What?

Binder是什么?Binder是Android系统中的一种进程间通讯方式,因为平时开发App一般不涉及到这方面的东西,所以一般开发者了解比较少,今天我们来学习一下Binder机制。

先来看Google给Binder类的描述:

Base class for a remotable object, the core part of a lightweight remote procedure call mechanism defined by IBinder. This class is an implementation of IBinder that provides standard local implementation of such an object.

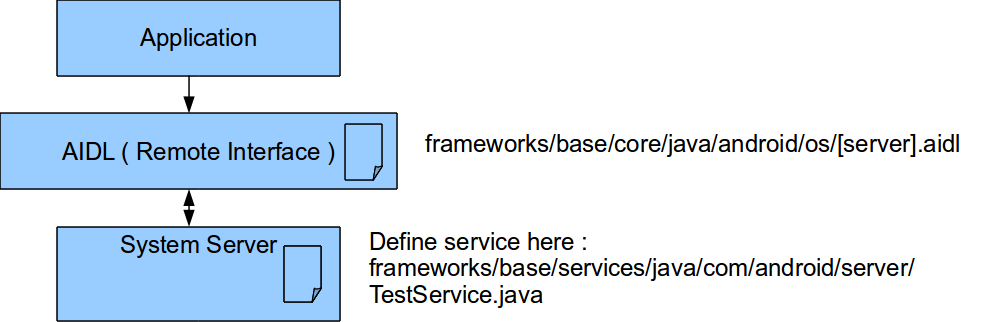
Most developers will not implement this class directly, instead using the aidl tool to describe the desired interface, having it generate the appropriate Binder subclass. You can, however, derive directly from Binder to implement your own custom RPC protocol or simply instantiate a raw Binder object directly to use as a token that can be shared across processes.

This class is just a basic IPC primitive; it has no impact on an application’s lifecycle, and is valid only as long as the process that created it continues to run. To use this correctly, you must be doing so within the context of a top-level application component (a Service, Activity, or ContentProvider) that lets the system know your process should remain running.

You must keep in mind the situations in which your process could go away, and thus require that you later re-create a new Binder and re-attach it when the process starts again. For example, if you are using this within an Activity, your activity’s process may be killed any time the activity is not started; if the activity is later re-created you will need to create a new Binder and hand it back to the correct place again; you need to be aware that your process may be started for another reason (for example to receive a broadcast) that will not involve re-creating the activity and thus run its code to create a new Binder.

Binder是远程对象的基类,它的核心部分:轻量级远程过程调用链由IBinder定义,这个类是IBinder的实现,提供标准本地实现。

大部分开发者不需要直接实现这个类,作为代替使用AIDL工具来描述想要的接口,生成合适的Binder的子类。

你可以直接从Binder获得实现你自己的远程过程调用协议或者是简单的取得一个Binder实例来作为一个可以被跨进程共享的标记来使用。

Binder这个类只是一个原始的IPC方式,它对App的生命周期没有影响,它从进程创建并运行它起才开始生效。为了正确的使用它,你必须要在顶层App组件环境里使用来让系统知道你的进程应该保持运行。

你一定要记住有些情况下你的进程会go away,这就要求你在之后重新创建一个新的Binder并且重新attach它当这个进程再次启动。举个例子,如果你在Activity里使用它,当这个activity没有启动时,你的activity所在的进程可能在任何时间被杀掉,如果这个activity之后被重建,你需要创建一个新的Binder并把它放到正确的位置,你要注意你的进程可能因为其它的原因而启动(例如接收广播),这种情况下不会重新创建activity,这就需要你来自己处理创建一个新的Binder。

这一段说了些什么呢?简单的总结一下:

Binder类只是一个简单的IPC方式,我们需要自己实现我们希望的逻辑,Binder可以简单的作为一个进程间共享的变量来使用,也可以作为一套复杂的协议来处理,这取决于你怎么实现它。作为App开发者,通常情况下我们可以使用AIDL工具来帮助我们生成Binder。

使用Binder时要注意进程的变化情况和Binder所在的环境,进程有可能意外被杀死或者唤起,这就需要你去做对应的处理。

接下来来看看IBinder这个类的描述:

Base interface for a remotable object, the core part of a lightweight remote procedure call mechanism designed for high performance when performing in-process and cross-process calls. This interface describes the abstract protocol for interacting with a remotable object. Do not implement this interface directly, instead extend from Binder.

The key IBinder API is transact() matched by Binder.onTransact(). These methods allow you to send a call to an IBinder object and receive a call coming in to a Binder object, respectively. This transaction API is synchronous, such that a call to transact() does not return until the target has returned from Binder.onTransact(); this is the expected behavior when calling an object that exists in the local process, and the underlying inter-process communication (IPC) mechanism ensures that these same semantics apply when going across processes.

The data sent through transact() is a Parcel, a generic buffer of data that also maintains some meta-data about its contents. The meta data is used to manage IBinder object references in the buffer, so that those references can be maintained as the buffer moves across processes. This mechanism ensures that when an IBinder is written into a Parcel and sent to another process, if that other process sends a reference to that same IBinder back to the original process, then the original process will receive the same IBinder object back. These semantics allow IBinder/Binder objects to be used as a unique identity (to serve as a token or for other purposes) that can be managed across processes.

The system maintains a pool of transaction threads in each process that it runs in. These threads are used to dispatch all IPCs coming in from other processes. For example, when an IPC is made from process A to process B, the calling thread in A blocks in transact() as it sends the transaction to process B. The next available pool thread in B receives the incoming transaction, calls Binder.onTransact() on the target object, and replies with the result Parcel. Upon receiving its result, the thread in process A returns to allow its execution to continue. In effect, other processes appear to use as additional threads that you did not create executing in your own process.

The Binder system also supports recursion across processes. For example if process A performs a transaction to process B, and process B while handling that transaction calls transact() on an IBinder that is implemented in A, then the thread in A that is currently waiting for the original transaction to finish will take care of calling Binder.onTransact() on the object being called by B. This ensures that the recursion semantics when calling remote binder object are the same as when calling local objects.

When working with remote objects, you often want to find out when they are no longer valid. There are three ways this can be determined:

  • The transact() method will throw a RemoteException exception if you try to call it on an IBinder whose process no longer exists.
  • The pingBinder() method can be called, and will return false if the remote process no longer exists.
  • The linkToDeath() method can be used to register a IBinder.DeathRecipient with the IBinder, which will be called when its containing process goes away.

IBinder是为远程对象提供的基本接口,它是高效执行进程间和跨进程调用的轻量级远程调用机制的核心部分。这个接口描述了与远程对象交互的抽象协议。不要直接实现这个接口,而应该继承Binder来使用它。

IBinder的关键API是和Binder.onTransact匹配的transact方法。这些方法分别允许你传递一个调用给IBinder对象和接受来自Binder对象的调用。这俩方法都是同步的,即一直堵塞直到返回结果,

SystemServe学习记录

1.What?

SystemServe是什么呢?

要理解SystemService,首先要理解Android系统的基本结构。

大家经常看到Android系统是C/S架构这样的表述,但是又有多少人真正理解这句话呢?所谓的架构是指什么呢?首先让我们来看两张图:

这两张图是我操作系统课本上的原话。操作系统如何组织运行时结构呢?大家也许都知道C语言里的系统调用,采用系统调用是把整个操作系统视为一种服务,用户通过系统调用和操作系统进行交互。而Android是采用的则是另外一种方式,以C/S架构的形式把所有操作系统可以提供的服务进行集合包装在一个进程里,这个进程就叫做系统服务进程,我们不与操作系统内核直接进行交互,而是以系统服务进程为中介,通过这个进程来调用操作系统提供的服务。

Customservice

我们自己的App要与System Server通信,实际上要通过进程间通信的方式,但是SDK已经封装好了一些系统服务,所以使用起来还是很简单的。

现在你应该明白SystemServe是什么了吧?这也是科班出身的优势,如果没有操作系统方面的知识,学起SystemServe这样的底层内容就是盲人摸象!我看了网上不少的博客,但是基本没有人从操作系统这个角度来分析SystemServe,动不动就是跑到SystemServe内部的各个服务,一下子让人一头雾水,学完了也是不知所谓。

下面我来总结一下:

SystemServe是Android系统所有核心服务所在的进程,比如负责启动Activity的ActivityManagerService,负责电源管理的PowerManagerService和负责创建Window的WindowManagerService,在这个进程里,每一个核心服务占据一个线程,我们通过SystemService这个进程来使用一些Android的核心服务。

这个进程属于Java层,由Zygote进程孵化而来,它是Android Runtime的一个重要组成部分。

在我们写App的时候,调用xxServiceManager实际上就是在与它交互。

2.How?

搞明白了SystemServe是什么,接下来就是怎么使用这个SystemServe。

使用SystemServe就是使用它包含的各个系统服务,首先我们来看看有哪些系统服务。

1
2
3
4
5
6
7
8
9
10
11
12
13
14
15
16
17
18
19
20
21
22
23
24
25
26
27
28
29
30
31
32
33
34
35
36
37
38
39
40
41
42
43
44
45
46
47
48
49
50
51
52
53
54
55
56
57
58
59
60
61
62
63
64
65
66
67
68
69
70
71
72
73
74
75
76
77
78
79
80
81
82
83
84
85
86
87
88
89
90
91
92
93
94
95
96
97
98
99
100
101
102
103
104
105
106
107
108
109
110
111
112
113
114
115
116
117
118
119
120
121
122
123
124
125
126
127
128
129
130
131
132
133
134
135
136
137
138
139
140
141
142
143
144
145
146
147
148
149
150
151
152
153
154
155
156
157
158
159
160
161
162
163
164
165
166
167
168
169
170
171
172
173
174
175
176
177
178
179
180
181
182
183
184
185
186
187
188
189
190
191
192
193
194
195
196
197
198
199
200
201
202
203
204
205
206
207
208
209
210
211
212
213
214
215
216
217
218
219
220
221
222
223
224
225
226
227
228
229
230
231
232
233
234
235
236
237
238
239
240
241
242
243
244
245
246
247
248
249
250
251
252
253
254
255
256
257
258
259
260
261
262
263
264
265
266
267
268
269
270
271
272
273
274
275
276
277
278
279
280
281
282
283
284
285
286
287
288
289
290
291
292
293
294
295
296
297
298
299
300
301
302
303
304
305
306
307
308
309
310
311
312
313
314
315
316
317
318
319
320
321
322
323
324
325
326
327
328
329
330
331
332
333
334
335
336
337
338
339
340
341
342
343
344
345
346
347
348
349
350
351
352
353
354
355
356
357
358
359
360
361
362
363
364
365
366
367
368
369
370
371
372
373
374
375
376
377
378
379
380
381
382
383
384
385
386
387
388
389
390
391
392
393
394
395
396
397
398
399
400
401
402
403
404
405
406
407
408
409
410
411
412
413
414
415
416
417
418
419
420
421
422
423
424
425
426
427
428
429
430
431
432
433
434
435
436
437
438
439
440
441
442
443
444
445
446
447
448
449
450
451
452
453
454
455
456
457
458
459
460
461
462
463
464
465
466
467
468
469
470
471
472
473
474
475
476
477
478
479
480
481
482
483
484
485
486
487
488
489
490
491
492
493
494
495
496
497
498
499
500
501
502
503
504
505
506
507
508
509
510
511
512
513
514
515
516
517
518
519
520
521
522
523
524
525
526
527
528
529
530
531
532
533
534
535
536
537
538
539
540
541
542
543
544
545
546
547
548
549
550
551
552
553
554
555
556
557
558
559
560
561
562
563
564
565
566
567
568
569
570
571
572
573
574
575
576
577
578
579
580
581
582
583
584
585
586
587
588
589
590
591
592
593
594
595
596
597
598
599
600
601
602
603
604
605
606
607
608
609
610
611
612
613
614
615
616
617
618
619
620
621
622
623
624
625
626
627
628
629
630
631
632
633
634
635
636
637
638
639
640
641
642
643
644
645
646
647
648
649
650
651
652
653
654
655
656
657
658
659
660
661
662
663
664
665
666
667
668
669
670
671
672
673
674
675
676
677
678
679
680
681
682
683
684
685
686
687
688
689
690
691
692
693
694
695
696
697
698
699
700
701
702
703
704
705
706
707
708
709
710
711
712
713
714
715
716
717
718
719
720
721
722
723
724
725
726
727
728
729
730
731
732
733
734
735
736
737
738
739
740
741
742
743
744
745
746
747
748
749
750
751
752
753
754
755
756
757
758
/**
* Use with {@link #getSystemService} to retrieve a
* {@link android.os.PowerManager} for controlling power management,
* including "wake locks," which let you keep the device on while
* you're running long tasks.
*/
public static final String POWER_SERVICE = "power";

/**
* Use with {@link #getSystemService} to retrieve a
* {@link android.os.RecoverySystem} for accessing the recovery system
* service.
*
* @see #getSystemService
* @hide
*/
public static final String RECOVERY_SERVICE = "recovery";

/**
* Use with {@link #getSystemService} to retrieve a
* {@link android.view.WindowManager} for accessing the system's window
* manager.
*
* @see #getSystemService
* @see android.view.WindowManager
*/
public static final String WINDOW_SERVICE = "window";

/**
* Use with {@link #getSystemService} to retrieve a
* {@link android.view.LayoutInflater} for inflating layout resources in this
* context.
*
* @see #getSystemService
* @see android.view.LayoutInflater
*/
public static final String LAYOUT_INFLATER_SERVICE = "layout_inflater";

/**
* Use with {@link #getSystemService} to retrieve a
* {@link android.accounts.AccountManager} for receiving intents at a
* time of your choosing.
*
* @see #getSystemService
* @see android.accounts.AccountManager
*/
public static final String ACCOUNT_SERVICE = "account";

/**
* Use with {@link #getSystemService} to retrieve a
* {@link android.app.ActivityManager} for interacting with the global
* system state.
*
* @see #getSystemService
* @see android.app.ActivityManager
*/
public static final String ACTIVITY_SERVICE = "activity";

/**
* Use with {@link #getSystemService} to retrieve a
* {@link android.app.AlarmManager} for receiving intents at a
* time of your choosing.
*
* @see #getSystemService
* @see android.app.AlarmManager
*/
public static final String ALARM_SERVICE = "alarm";

/**
* Use with {@link #getSystemService} to retrieve a
* {@link android.app.NotificationManager} for informing the user of
* background events.
*
* @see #getSystemService
* @see android.app.NotificationManager
*/
public static final String NOTIFICATION_SERVICE = "notification";

/**
* Use with {@link #getSystemService} to retrieve a
* {@link android.view.accessibility.AccessibilityManager} for giving the user
* feedback for UI events through the registered event listeners.
*
* @see #getSystemService
* @see android.view.accessibility.AccessibilityManager
*/
public static final String ACCESSIBILITY_SERVICE = "accessibility";

/**
* Use with {@link #getSystemService} to retrieve a
* {@link android.view.accessibility.CaptioningManager} for obtaining
* captioning properties and listening for changes in captioning
* preferences.
*
* @see #getSystemService
* @see android.view.accessibility.CaptioningManager
*/
public static final String CAPTIONING_SERVICE = "captioning";

/**
* Use with {@link #getSystemService} to retrieve a
* {@link android.app.NotificationManager} for controlling keyguard.
*
* @see #getSystemService
* @see android.app.KeyguardManager
*/
public static final String KEYGUARD_SERVICE = "keyguard";

/**
* Use with {@link #getSystemService} to retrieve a {@link
* android.location.LocationManager} for controlling location
* updates.
*
* @see #getSystemService
* @see android.location.LocationManager
*/
public static final String LOCATION_SERVICE = "location";

/**
* Use with {@link #getSystemService} to retrieve a
* {@link android.location.CountryDetector} for detecting the country that
* the user is in.
*
* @hide
*/
public static final String COUNTRY_DETECTOR = "country_detector";

/**
* Use with {@link #getSystemService} to retrieve a {@link
* android.app.SearchManager} for handling searches.
*
* @see #getSystemService
* @see android.app.SearchManager
*/
public static final String SEARCH_SERVICE = "search";

/**
* Use with {@link #getSystemService} to retrieve a {@link
* android.hardware.SensorManager} for accessing sensors.
*
* @see #getSystemService
* @see android.hardware.SensorManager
*/
public static final String SENSOR_SERVICE = "sensor";

/**
* Use with {@link #getSystemService} to retrieve a {@link
* android.os.storage.StorageManager} for accessing system storage
* functions.
*
* @see #getSystemService
* @see android.os.storage.StorageManager
*/
public static final String STORAGE_SERVICE = "storage";

/**
* Use with {@link #getSystemService} to retrieve a
* com.android.server.WallpaperService for accessing wallpapers.
*
* @see #getSystemService
*/
public static final String WALLPAPER_SERVICE = "wallpaper";

/**
* Use with {@link #getSystemService} to retrieve a {@link
* android.os.Vibrator} for interacting with the vibration hardware.
*
* @see #getSystemService
* @see android.os.Vibrator
*/
public static final String VIBRATOR_SERVICE = "vibrator";

/**
* Use with {@link #getSystemService} to retrieve a {@link
* android.app.StatusBarManager} for interacting with the status bar.
*
* @see #getSystemService
* @see android.app.StatusBarManager
* @hide
*/
public static final String STATUS_BAR_SERVICE = "statusbar";

/**
* Use with {@link #getSystemService} to retrieve a {@link
* android.net.ConnectivityManager} for handling management of
* network connections.
*
* @see #getSystemService
* @see android.net.ConnectivityManager
*/
public static final String CONNECTIVITY_SERVICE = "connectivity";

/**
* Use with {@link #getSystemService} to retrieve a {@link
* android.os.IUpdateLock} for managing runtime sequences that
* must not be interrupted by headless OTA application or similar.
*
* @hide
* @see #getSystemService
* @see android.os.UpdateLock
*/
public static final String UPDATE_LOCK_SERVICE = "updatelock";

/**
* Constant for the internal network management service, not really a Context service.
* @hide
*/
public static final String NETWORKMANAGEMENT_SERVICE = "network_management";

/**
* Use with {@link #getSystemService} to retrieve a {@link
* android.app.usage.NetworkStatsManager} for querying network usage stats.
*
* @see #getSystemService
* @see android.app.usage.NetworkStatsManager
*/
public static final String NETWORK_STATS_SERVICE = "netstats";
/** {@hide} */
public static final String NETWORK_POLICY_SERVICE = "netpolicy";

/**
* Use with {@link #getSystemService} to retrieve a {@link
* android.net.wifi.WifiManager} for handling management of
* Wi-Fi access.
*
* @see #getSystemService
* @see android.net.wifi.WifiManager
*/
public static final String WIFI_SERVICE = "wifi";

/**
* Use with {@link #getSystemService} to retrieve a {@link
* android.net.wifi.p2p.WifiP2pManager} for handling management of
* Wi-Fi peer-to-peer connections.
*
* @see #getSystemService
* @see android.net.wifi.p2p.WifiP2pManager
*/
public static final String WIFI_P2P_SERVICE = "wifip2p";

/**
* Use with {@link #getSystemService} to retrieve a
* {@link android.net.wifi.nan.WifiNanManager} for handling management of
* Wi-Fi NAN discovery and connections.
*
* @see #getSystemService
* @see android.net.wifi.nan.WifiNanManager
* @hide PROPOSED_NAN_API
*/
public static final String WIFI_NAN_SERVICE = "wifinan";

/**
* Use with {@link #getSystemService} to retrieve a {@link
* android.net.wifi.WifiScanner} for scanning the wifi universe
*
* @see #getSystemService
* @see android.net.wifi.WifiScanner
* @hide
*/
@SystemApi
public static final String WIFI_SCANNING_SERVICE = "wifiscanner";

/**
* Use with {@link #getSystemService} to retrieve a {@link
* android.net.wifi.RttManager} for ranging devices with wifi
*
* @see #getSystemService
* @see android.net.wifi.RttManager
* @hide
*/
@SystemApi
public static final String WIFI_RTT_SERVICE = "rttmanager";

/**
* Use with {@link #getSystemService} to retrieve a {@link
* android.net.EthernetManager} for handling management of
* Ethernet access.
*
* @see #getSystemService
* @see android.net.EthernetManager
*
* @hide
*/
public static final String ETHERNET_SERVICE = "ethernet";

/**
* Use with {@link #getSystemService} to retrieve a {@link
* android.net.nsd.NsdManager} for handling management of network service
* discovery
*
* @see #getSystemService
* @see android.net.nsd.NsdManager
*/
public static final String NSD_SERVICE = "servicediscovery";

/**
* Use with {@link #getSystemService} to retrieve a
* {@link android.media.AudioManager} for handling management of volume,
* ringer modes and audio routing.
*
* @see #getSystemService
* @see android.media.AudioManager
*/
public static final String AUDIO_SERVICE = "audio";

/**
* Use with {@link #getSystemService} to retrieve a
* {@link android.hardware.fingerprint.FingerprintManager} for handling management
* of fingerprints.
*
* @see #getSystemService
* @see android.hardware.fingerprint.FingerprintManager
*/
public static final String FINGERPRINT_SERVICE = "fingerprint";

/**
* Use with {@link #getSystemService} to retrieve a
* {@link android.media.MediaRouter} for controlling and managing
* routing of media.
*
* @see #getSystemService
* @see android.media.MediaRouter
*/
public static final String MEDIA_ROUTER_SERVICE = "media_router";

/**
* Use with {@link #getSystemService} to retrieve a
* {@link android.media.session.MediaSessionManager} for managing media Sessions.
*
* @see #getSystemService
* @see android.media.session.MediaSessionManager
*/
public static final String MEDIA_SESSION_SERVICE = "media_session";

/**
* Use with {@link #getSystemService} to retrieve a
* {@link android.telephony.TelephonyManager} for handling management the
* telephony features of the device.
*
* @see #getSystemService
* @see android.telephony.TelephonyManager
*/
public static final String TELEPHONY_SERVICE = "phone";

/**
* Use with {@link #getSystemService} to retrieve a
* {@link android.telephony.SubscriptionManager} for handling management the
* telephony subscriptions of the device.
*
* @see #getSystemService
* @see android.telephony.SubscriptionManager
*/
public static final String TELEPHONY_SUBSCRIPTION_SERVICE = "telephony_subscription_service";

/**
* Use with {@link #getSystemService} to retrieve a
* {@link android.telecom.TelecomManager} to manage telecom-related features
* of the device.
*
* @see #getSystemService
* @see android.telecom.TelecomManager
*/
public static final String TELECOM_SERVICE = "telecom";

/**
* Use with {@link #getSystemService} to retrieve a
* {@link android.telephony.CarrierConfigManager} for reading carrier configuration values.
*
* @see #getSystemService
* @see android.telephony.CarrierConfigManager
*/
public static final String CARRIER_CONFIG_SERVICE = "carrier_config";

/**
* Use with {@link #getSystemService} to retrieve a
* {@link android.text.ClipboardManager} for accessing and modifying
* {@link android.content.ClipboardManager} for accessing and modifying
* the contents of the global clipboard.
*
* @see #getSystemService
* @see android.content.ClipboardManager
*/
public static final String CLIPBOARD_SERVICE = "clipboard";

/**
* Use with {@link #getSystemService} to retrieve a
* {@link android.view.inputmethod.InputMethodManager} for accessing input
* methods.
*
* @see #getSystemService
*/
public static final String INPUT_METHOD_SERVICE = "input_method";

/**
* Use with {@link #getSystemService} to retrieve a
* {@link android.view.textservice.TextServicesManager} for accessing
* text services.
*
* @see #getSystemService
*/
public static final String TEXT_SERVICES_MANAGER_SERVICE = "textservices";

/**
* Use with {@link #getSystemService} to retrieve a
* {@link android.appwidget.AppWidgetManager} for accessing AppWidgets.
*
* @see #getSystemService
*/
public static final String APPWIDGET_SERVICE = "appwidget";

/**
* Official published name of the (internal) voice interaction manager service.
*
* @hide
* @see #getSystemService
*/
public static final String VOICE_INTERACTION_MANAGER_SERVICE = "voiceinteraction";

/**
* Use with {@link #getSystemService} to access the
* {@link com.android.server.voiceinteraction.SoundTriggerService}.
*
* @hide
* @see #getSystemService
*/
public static final String SOUND_TRIGGER_SERVICE = "soundtrigger";


/**
* Use with {@link #getSystemService} to retrieve an
* {@link android.app.backup.IBackupManager IBackupManager} for communicating
* with the backup mechanism.
* @hide
*
* @see #getSystemService
*/
@SystemApi
public static final String BACKUP_SERVICE = "backup";

/**
* Use with {@link #getSystemService} to retrieve a
* {@link android.os.DropBoxManager} instance for recording
* diagnostic logs.
* @see #getSystemService
*/
public static final String DROPBOX_SERVICE = "dropbox";

/**
* System service name for the DeviceIdleController. There is no Java API for this.
* @see #getSystemService
* @hide
*/
public static final String DEVICE_IDLE_CONTROLLER = "deviceidle";

/**
* Use with {@link #getSystemService} to retrieve a
* {@link android.app.admin.DevicePolicyManager} for working with global
* device policy management.
*
* @see #getSystemService
*/
public static final String DEVICE_POLICY_SERVICE = "device_policy";

/**
* Use with {@link #getSystemService} to retrieve a
* {@link android.app.UiModeManager} for controlling UI modes.
*
* @see #getSystemService
*/
public static final String UI_MODE_SERVICE = "uimode";

/**
* Use with {@link #getSystemService} to retrieve a
* {@link android.app.DownloadManager} for requesting HTTP downloads.
*
* @see #getSystemService
*/
public static final String DOWNLOAD_SERVICE = "download";

/**
* Use with {@link #getSystemService} to retrieve a
* {@link android.os.BatteryManager} for managing battery state.
*
* @see #getSystemService
*/
public static final String BATTERY_SERVICE = "batterymanager";

/**
* Use with {@link #getSystemService} to retrieve a
* {@link android.nfc.NfcManager} for using NFC.
*
* @see #getSystemService
*/
public static final String NFC_SERVICE = "nfc";

/**
* Use with {@link #getSystemService} to retrieve a
* {@link android.bluetooth.BluetoothManager} for using Bluetooth.
*
* @see #getSystemService
*/
public static final String BLUETOOTH_SERVICE = "bluetooth";

/**
* Use with {@link #getSystemService} to retrieve a
* {@link android.net.sip.SipManager} for accessing the SIP related service.
*
* @see #getSystemService
*/
/** @hide */
public static final String SIP_SERVICE = "sip";

/**
* Use with {@link #getSystemService} to retrieve a {@link
* android.hardware.usb.UsbManager} for access to USB devices (as a USB host)
* and for controlling this device's behavior as a USB device.
*
* @see #getSystemService
* @see android.hardware.usb.UsbManager
*/
public static final String USB_SERVICE = "usb";

/**
* Use with {@link #getSystemService} to retrieve a {@link
* android.hardware.SerialManager} for access to serial ports.
*
* @see #getSystemService
* @see android.hardware.SerialManager
*
* @hide
*/
public static final String SERIAL_SERVICE = "serial";

/**
* Use with {@link #getSystemService} to retrieve a
* {@link android.hardware.hdmi.HdmiControlManager} for controlling and managing
* HDMI-CEC protocol.
*
* @see #getSystemService
* @see android.hardware.hdmi.HdmiControlManager
* @hide
*/
@SystemApi
public static final String HDMI_CONTROL_SERVICE = "hdmi_control";

/**
* Use with {@link #getSystemService} to retrieve a
* {@link android.hardware.input.InputManager} for interacting with input devices.
*
* @see #getSystemService
* @see android.hardware.input.InputManager
*/
public static final String INPUT_SERVICE = "input";

/**
* Use with {@link #getSystemService} to retrieve a
* {@link android.hardware.display.DisplayManager} for interacting with display devices.
*
* @see #getSystemService
* @see android.hardware.display.DisplayManager
*/
public static final String DISPLAY_SERVICE = "display";

/**
* Use with {@link #getSystemService} to retrieve a
* {@link android.os.UserManager} for managing users on devices that support multiple users.
*
* @see #getSystemService
* @see android.os.UserManager
*/
public static final String USER_SERVICE = "user";

/**
* Use with {@link #getSystemService} to retrieve a
* {@link android.content.pm.LauncherApps} for querying and monitoring launchable apps across
* profiles of a user.
*
* @see #getSystemService
* @see android.content.pm.LauncherApps
*/
public static final String LAUNCHER_APPS_SERVICE = "launcherapps";

/**
* Use with {@link #getSystemService} to retrieve a
* {@link android.content.RestrictionsManager} for retrieving application restrictions
* and requesting permissions for restricted operations.
* @see #getSystemService
* @see android.content.RestrictionsManager
*/
public static final String RESTRICTIONS_SERVICE = "restrictions";

/**
* Use with {@link #getSystemService} to retrieve a
* {@link android.app.AppOpsManager} for tracking application operations
* on the device.
*
* @see #getSystemService
* @see android.app.AppOpsManager
*/
public static final String APP_OPS_SERVICE = "appops";

/**
* Use with {@link #getSystemService} to retrieve a
* {@link android.hardware.camera2.CameraManager} for interacting with
* camera devices.
*
* @see #getSystemService
* @see android.hardware.camera2.CameraManager
*/
public static final String CAMERA_SERVICE = "camera";

/**
* {@link android.print.PrintManager} for printing and managing
* printers and print tasks.
*
* @see #getSystemService
* @see android.print.PrintManager
*/
public static final String PRINT_SERVICE = "print";

/**
* Use with {@link #getSystemService} to retrieve a
* {@link android.hardware.ConsumerIrManager} for transmitting infrared
* signals from the device.
*
* @see #getSystemService
* @see android.hardware.ConsumerIrManager
*/
public static final String CONSUMER_IR_SERVICE = "consumer_ir";

/**
* {@link android.app.trust.TrustManager} for managing trust agents.
* @see #getSystemService
* @see android.app.trust.TrustManager
* @hide
*/
public static final String TRUST_SERVICE = "trust";

/**
* Use with {@link #getSystemService} to retrieve a
* {@link android.media.tv.TvInputManager} for interacting with TV inputs
* on the device.
*
* @see #getSystemService
* @see android.media.tv.TvInputManager
*/
public static final String TV_INPUT_SERVICE = "tv_input";

/**
* {@link android.net.NetworkScoreManager} for managing network scoring.
* @see #getSystemService
* @see android.net.NetworkScoreManager
* @hide
*/
@SystemApi
public static final String NETWORK_SCORE_SERVICE = "network_score";

/**
* Use with {@link #getSystemService} to retrieve a {@link
* android.app.usage.UsageStatsManager} for querying device usage stats.
*
* @see #getSystemService
* @see android.app.usage.UsageStatsManager
*/
public static final String USAGE_STATS_SERVICE = "usagestats";

/**
* Use with {@link #getSystemService} to retrieve a {@link
* android.app.job.JobScheduler} instance for managing occasional
* background tasks.
* @see #getSystemService
* @see android.app.job.JobScheduler
*/
public static final String JOB_SCHEDULER_SERVICE = "jobscheduler";

/**
* Use with {@link #getSystemService} to retrieve a {@link
* android.service.persistentdata.PersistentDataBlockManager} instance
* for interacting with a storage device that lives across factory resets.
*
* @see #getSystemService
* @see android.service.persistentdata.PersistentDataBlockManager
* @hide
*/
@SystemApi
public static final String PERSISTENT_DATA_BLOCK_SERVICE = "persistent_data_block";

/**
* Use with {@link #getSystemService} to retrieve a {@link
* android.media.projection.MediaProjectionManager} instance for managing
* media projection sessions.
* @see #getSystemService
* @see android.media.projection.MediaProjectionManager
*/
public static final String MEDIA_PROJECTION_SERVICE = "media_projection";

/**
* Use with {@link #getSystemService} to retrieve a
* {@link android.media.midi.MidiManager} for accessing the MIDI service.
*
* @see #getSystemService
*/
public static final String MIDI_SERVICE = "midi";


/**
* Use with {@link #getSystemService} to retrieve a
* {@link android.hardware.radio.RadioManager} for accessing the broadcast radio service.
*
* @see #getSystemService
* @hide
*/
public static final String RADIO_SERVICE = "radio";

/**
* Use with {@link #getSystemService} to retrieve a
* {@link android.os.HardwarePropertiesManager} for accessing the hardware properties service.
*
* @see #getSystemService
*/
public static final String HARDWARE_PROPERTIES_SERVICE = "hardware_properties";

/**
* TODO Javadoc
*
* @see #getSystemService
* @see android.content.pm.ShortcutManager
*
* @hide
*/
public static final String SHORTCUT_SERVICE = "shortcut";

/**
* Use with {@link #getSystemService} to retrieve a {@link
* android.hardware.location.ContextHubManager} for accessing context hubs.
*
* @see #getSystemService
* @see android.hardware.location.ContextHubManager
*
* @hide
*/
@SystemApi
public static final String CONTEXTHUB_SERVICE = "contexthub";

/**
* Use with {@link #getSystemService} to retrieve a
* {@link android.os.health.SystemHealthManager} for accessing system health (battery, power,
* memory, etc) metrics.
*
* @see #getSystemService
*/
public static final String SYSTEM_HEALTH_SERVICE = "systemhealth";

/**
* Gatekeeper Service.
* @hide
*/
public static final String GATEKEEPER_SERVICE = "android.service.gatekeeper.IGateKeeperService";

我把所有的SystemServe都贴出来,注意:其中有一部分加上了注解@SystemApi,这些Service不是给App开发者使用的,通过SystemServe也拿不到这个Service实例。

使用这些系统核心服务的方法是很简单的:

getSystemService(XXXX_SERVICE)

通过xxServiceManager调用的方法最后都会被Binder转移到对应的Serve。

至于怎么Binder怎么实现这个过程,具体有哪些Service,这又是另一个问题了。

这次就到这里,接下来的内容涉及到底层的C++代码,留置以后解决。

第一个Xposed插件

本篇记载我搭建Xposed开发环境到第一个Xposed插件的过程。

Xposed原理概述:

Android系统中,一个App的运行要借助于虚拟机进程,因为我们都知道Android系统的底层其实是由C++编写的Linux,那么这样的系统如何运行我们使用Java编写的上层App呢?很简单,为每一个App提供一个虚拟机进程,App在虚拟机中运行就没有问题了。Android中有一个特殊的进程负责创建这些虚拟机进程,它就是Zygote进程,Zygote进程在创建时。每一次创建一个虚拟机进程都是从Zygote进程fork出来,学过操作系统的同学都知道所谓的fork创建就是去拷贝一份进程的备份,因此每一个虚拟机进程都会享有这个Zygote进程的所有资源,比如运行时库,因此只要能修改Zygote进程,理论上就能控制所有其他应用进程,Xposed正是通过修改Zygote进程来完成劫持的。

注:这里的虚拟机进程指的是运行了一个虚拟机实例的进程,而Java程序就在这个虚拟机实例中运行。我简单的理一下这个关系:Zygote进程->拷贝一份应用进程->拥有一个虚拟机实例->运行Java程序。通过这样一种方式,Android系统只需要对虚拟机初始化一次,以后每一次创建虚拟机只用拷贝就完成了,且对于静态库,所有虚拟机与Zygote进程共享,这也可以节省内存。

Xposed的最终效果是实现对方法的劫持,也就是我们可以对任何一个方法的内容进行重写。

1.在手机上安装Xposed。

安装Xposed是个非常麻烦的事情,我的测试机是红米2 miUI7稳定版,我本来想在这台测试机上安装Xposed,但是这台手机没有root也没有合适的rom,如果要装在这台手机上可能要浪费大量的时间去刷机,最后我选择放弃在实机上安装,转而在Genymotion下的虚拟机上安装。

我虚拟机配置:

Google Nexus 6 - 5.0.0 API 21

Genymotion上的虚拟机自带root授权管理,我在root权限下安装。

Xposed有两个部分:

(1)XposedInstall—一个apk应用,这个东西是负责与用户交互和管理Xposed插件的Android应用,这个东西安装起来是很容易的,使用Genymotion只需要把apk拖入虚拟机窗口就能自行识别。

(2)Xposed SDK—实现root的底层库,这个东西是一个zip文件,需要以Recovery的方式刷上手机,且官方对Recovery的工具有明确的要求,不能使用源生的工具,也就是说你得先刷上要求的Recovery工具,非常的麻烦。幸运的是Genymotion下有很简单的工具在虚拟机环境下帮助我们快速刷机,GenyFlash,使用这个工具可以直接像安装apk一样刷机,很方便的就能装上SDK。

2.在Mac下配置Xposed插件开发环境

我起初以为开发Xposed的插件会非常的麻烦,因为它可能不是标准的Android工程,不能通过Android Studio这样IDE的编译。后来试了一下,其实很简单,开发Xposed插件就和一般的App没有什么两样,它只要求你mainfest和一些文件里多加少许识别的标记。

Xposed插件本身就是一个Android App,我们之前安装的XposedInstall就专门管理这批App,在编写插件的时候可以把App本身的启动icon设置为不显示,这样就只能在XposedInstall里找到它。

Xposed的开发和普通的App是一样的,因此我们只需要添加Xposed插件需要的依赖就行了。

我在Mac下的Android Studio中编写Xposed插件,因此我使用Gradle添加依赖如下:

app/build.gradle

provided 'de.robv.android.xposed:api:82'

这个东西好像是会引用本机上安装的sdk,但是我现在也搞不太清楚,目前先记住它是我们项目需要的依赖就够了。

3.Xposed Hello World

下面开始第一个Xposed插件的编写:

为了更直观的看到Xposed的作用,我们跳过官方文档提供的最简单的simple,直接编写第一个Hook插件。

首先创建一个简单的工程,它将被Xposed劫持并修改。

因为这个工程的内容很简单,我只贴Acitivity里面的代码:

1
2
3
4
5
6
7
8
9
10
11
12
13
14
15
16
17
18
19
20
21
22
23
24
25
26
package com.zuliangwang.test;

import android.support.v7.app.AppCompatActivity;
import android.os.Bundle;
import android.view.View;
import android.widget.Button;
import android.widget.TextView;

public class MainActivity extends AppCompatActivity {

@Override
protected void onCreate(Bundle savedInstanceState) {
super.onCreate(savedInstanceState);
setContentView(R.layout.activity_main);

final TextView textView = (TextView) findViewById(R.id.test_text);
Button button = (Button) findViewById(R.id.test_button);

button.setOnClickListener(new View.OnClickListener() {
@Override
public void onClick(View v) {
textView.setText("GG");
}
});
}
}

一个TextView和一个Button,当点击Button,TextView的内容将被修改。

我们的目的就是劫持这个TextView的setText方法,修改传入的参数,最后的text将不是“GG”

接下来创建一个Xposed插件工程。

首先修改AndroidMainfest的内容:

1
2
3
4
5
6
7
8
9
10
11
12
13
14
15
16
17
18
19
20
21
22
23
24
25
26
27
28
29
30
31
32
33
34
35
<?xml version="1.0" encoding="utf-8"?>
<manifest package="com.zuliangwang.firstxposed"
xmlns:android="http://schemas.android.com/apk/res/android">


<application
android:allowBackup="true"
android:icon="@mipmap/ic_launcher"
android:label="@string/app_name"
android:supportsRtl="true"
android:theme="@style/AppTheme">


<!-- 是否是xposed模块,xposed根据这个来判断是否是模块 -->
<meta-data
android:name="xposedmodule"
android:value="true" />


<!-- 模块描述,显示在xposed模块列表那里第二行 -->
<meta-data
android:name="xposeddescription"
android:value="测试Xposed模块" />


<!-- 最低xposed版本号(lib文件名可知) -->
<meta-data
android:name="xposedminversion"
android:value="30" />


<activity android:name=".MainActivity">
<intent-filter>
<action android:name="android.intent.action.MAIN"/>

<category android:name="android.intent.category.LAUNCHER"/>
</intent-filter>
</activity>
</application>

这个玩意是给XposedInstall提供的本插件的描述。

接下来在main文件夹下创建assets文件夹,在里面创建一个简单的文本文件xposed_init,这个名字是有要求的。

1
com.zuliangwang.firstxposed.DIAO

这个文件里只有一行代码,是一个类的名字,它告诉xposed我们这个插件的执行入口。

接下来就在这个类里编写具体的逻辑:

1
2
3
4
5
6
7
8
9
10
11
12
13
14
15
16
17
18
19
20
21
22
23
24
25
26
27
28
29
30
31
32
33
34
35
36
37
38
39
40
41
42
package com.zuliangwang.firstxposed;

import android.widget.TextView;

import de.robv.android.xposed.IXposedHookLoadPackage;
import de.robv.android.xposed.XC_MethodHook;
import de.robv.android.xposed.XposedBridge;
import de.robv.android.xposed.XposedHelpers;
import de.robv.android.xposed.callbacks.XC_LoadPackage;

/**
* Created by zuliangwang on 16/11/27.
*/


public class DIAO implements IXposedHookLoadPackage {
@Override
public void handleLoadPackage(XC_LoadPackage.LoadPackageParam loadPackageParam) throws Throwable {
XposedBridge.log("begin");

if (loadPackageParam.packageName.equals("com.zuliangwang.test")){
XposedBridge.log("hint");


XposedHelpers.findAndHookMethod(TextView.class, "setText", CharSequence.class,
new XC_MethodHook() {
@Override
protected void beforeHookedMethod(MethodHookParam param) throws Throwable {
XposedBridge.log("before");
param.args[0] = "修改了";
}

@Override
protected void afterHookedMethod(MethodHookParam param) throws Throwable {
XposedBridge.log("after");
}
});

}


}
}

通过Xposed提供的方法,我们可以修改另一个Android App的方法的参数,现在编译这个工程,你会在XposedInstall里看到这个新的插件。点击运行第一个Test工程,你可以看到结果如下:

result

可以看到,这个App的逻辑被我们写的插件给劫持了!

第一个插件到此完成。

XposedInstall和XposedSdk 传送门

GenyFlash 传送门

XposedBridge官方文档 传送门

Android动画总结

Android的动画可以分为三类:

(1)View Animation:最早的Android动画实现,这种动画只能设置给view使用。

(2)Drawable Animation:实现类似幻灯片放映的效果,一张张切换Drawable。

(3)Property Animation:最后出现的动画实现,属性动画,在Android3.0以后才可以使用,这种动画可以设置给任何Object使用,且可以扩展,支持实现任何效果的动画。

让我们一个一个来看

(1)View Animation

Animation的既可以以xml的形式使用,也可以使用Java代码的方式。

现在先让我写一个最简单的透明动画的使用demo:

1
2
3
4
5
6
7
8
9
10
<?xml version="1.0" encoding="utf-8"?>
<set
android:duration="200"
xmlns:android="http://schemas.android.com/apk/res/android">


<alpha android:fromAlpha="0"
android:toAlpha="1"/>


</set>

以xml的形式定义了一个简单的动画集合,这个集合里目前只有一个透明渐变的动画。

注意,AnimationSet是Animation的子类,它也是一种动画,只不过和它的名字一样,是一个动画的集合,通过这个类,我们可以把多种简单的动画组合在一起,实现一个更为复杂的动画,我演示的demo里只有一个简单的渐变动画。

xml里的这几个属性值都很容易理解,duration就是动画的总时间,fromAlpha和toAlpha是起始透明度和目标透明度,这个动画会让一个view在200ms的时间内由透明变为不透明。

接下来我们在Activity中使用这个Animation:

1
2
3
4
5
6
7
8
9
10
11
12
13
14
15
16
17
18
19
20
21
22
23
24
25
26
27
28
29
30
31
package com.zuliangwang.learnanimation;

import android.support.v7.app.AppCompatActivity;
import android.os.Bundle;
import android.view.View;
import android.view.animation.Animation;
import android.view.animation.AnimationSet;
import android.view.animation.AnimationUtils;
import android.widget.Button;
import android.widget.TextView;

public class MainActivity extends AppCompatActivity {

@Override
protected void onCreate(Bundle savedInstanceState) {
super.onCreate(savedInstanceState);
setContentView(R.layout.activity_main);

final TextView textView = (TextView) findViewById(R.id.test_text);
Button button = (Button) findViewById(R.id.test_button);
final Animation animation = AnimationUtils.loadAnimation(getBaseContext(),R.anim.test_anim);

button.setOnClickListener(new View.OnClickListener() {
@Override
public void onClick(View v) {
textView.startAnimation(animation);
}
});

}
}

代码内容很简单,点击Button就可以让动画作用于textview。

有一点一定要记住,View Animation不能使view的实际位置发生变化,也就是说如果你使用了平移动画,最后你看到的view位置点击是无效的,这是你点击原来的位置才能触发触摸的时间。

View Animation的简单使用到这里结束,下面是第二个动画,Drawable Animation。

(2)Drawable Animation

我查了一些东西,发现这个动画用的是比较少的,而且场景非常单一,它主要用来实现一些代码难以直接实现的逐帧动画,例如京东app上的奔跑的快递员的动画。

官网上给了明确的使用方法,我也写了一个简单的demo:

1
2
3
4
5
6
7
<?xml version="1.0" encoding="utf-8"?>
<animation-list
android:oneshot="false" xmlns:android="http://schemas.android.com/apk/res/android">

<item android:drawable="@drawable/jiang1" android:duration="200"/>
<item android:drawable="@drawable/jiang2" android:duration="200"/>
<item android:drawable="@drawable/jiang3" android:duration="200"/>
</animation-list>

还是使用xml的形式使用,Drawable Animation的xml文件是放在drawable文件夹而不是anim,这点要注意一下。

动画的效果是从第一张图片开始,一直播放到最后一张图片。如果onshot设置为false,则会循环不停播放,如果为true,那么一次之后就会停止。

在Activity里的使用:

1
2
3
4
5
6
7
8
9
10
11
12
13
14
15
16
17
18
19
20
21
22
23
24
25
26
27
28
29
30
31
32
33
34
35
36
37
package com.zuliangwang.learnanimation;

import android.graphics.drawable.AnimationDrawable;
import android.support.v7.app.AppCompatActivity;
import android.os.Bundle;
import android.view.View;
import android.view.animation.Animation;
import android.view.animation.AnimationSet;
import android.view.animation.AnimationUtils;
import android.widget.Button;
import android.widget.ImageView;
import android.widget.TextView;

public class MainActivity extends AppCompatActivity {

@Override
protected void onCreate(Bundle savedInstanceState) {
super.onCreate(savedInstanceState);
setContentView(R.layout.activity_main);

final TextView textView = (TextView) findViewById(R.id.test_text);
ImageView imageView = (ImageView) findViewById(R.id.test_image);
Button button = (Button) findViewById(R.id.test_button);

final Animation animation = AnimationUtils.loadAnimation(getBaseContext(),R.anim.test_anim);
final AnimationDrawable animationDrawable = (AnimationDrawable) imageView.getBackground();

button.setOnClickListener(new View.OnClickListener() {
@Override
public void onClick(View v) {
textView.startAnimation(animation);
animationDrawable.start();
}
});

}
}

Drawable Animation到这里结束。最后是最复杂的属性动画。

(3)Property Animation

使用属性动画前需要先了解一下插值器(Interpolator)的概念,因为插值器是使用属性动画的核心。

插值器,简单的来说就说一个数值控制器,它根据输入的值和预设的计算方法控制输出值,这个输出值最后交给属性动画,从而控制属性动画的变化速率。输入值可以是任何值,最后改变一个对象的某个filed。

插值器本身不参与关于UI的任何行为,它只是一个计算工具,真正去实现动画的还是Property Animation。

The property animation system is a robust framework that allows you to animate almost anything. You can define an animation to change any object property over time, regardless of whether it draws to the screen or not. A property animation changes a property’s (a field in an object) value over a specified length of time. To animate something, you specify the object property that you want to animate, such as an object’s position on the screen, how long you want to animate it for, and what values you want to animate between.

以上说明来自Google的官方文档,可以看到,不管是不是我们可以在屏幕上看到的属性(位置、长度等),都可以使用属性动画来进行修改,这个行为实际上是通过插值器来实现的,但是通常来说,我们使用属性动画的目标就是来修改位置、长度等属性,从而实现动画的效果。

由于属性动画本身非常复杂,使用起来也比较麻烦,但是相比View Animation它能实现更多更好的动画效果,我们跟着官方文档一步步走,把属性动画的使用搞清楚。

The property animation system lets you define the following characteristics of an animation:

  • Duration: You can specify the duration of an animation. The default length is 300 ms.
  • Time interpolation: You can specify how the values for the property are calculated as a function of the animation’s current elapsed time.
  • Repeat count and behavior: You can specify whether or not to have an animation repeat when it reaches the end of a duration and how many times to repeat the animation. You can also specify whether you want the animation to play back in reverse. Setting it to reverse plays the animation forwards then backwards repeatedly, until the number of repeats is reached.
  • Animator sets: You can group animations into logical sets that play together or sequentially or after specified delays.
  • Frame refresh delay: You can specify how often to refresh frames of your animation. The default is set to refresh every 10 ms, but the speed in which your application can refresh frames is ultimately dependent on how busy the system is overall and how fast the system can service the underlying timer.

属性动画系统允许你定义一下几种动画的特性。

  • Duration:你可以指定动画的具体间隔,默认情况下是300ms。
  • Time interpolation:你可以指定如何根据属性值的来计算当前动画的运行时间。
  • Repeat count and behavior:你可以指定当动画按照duration结束后是否让动画重复。你可以指定是否让动画从后向前播放。设置它来反向播放动画,先正常播放然后从后向前播放,重复这样的操作直到运行到指定次数。
  • Animator sets:你可以把多个动画设置成一组放置在set里,它们可以同时播放、按照顺序播放、在指定延迟后播放。
  • Frame refresh delay:你可以指定多久刷新一次动画帧。默认情况下每10ms刷新一次,但是实际上刷新速度取决于你的系统整体的忙碌程序和响应时间。这个意思就是说你可以指定刷新频率,但是实际刷新频率最终取决于底层的一些东西,你的频率仅仅是一个参考值。

接下来官方文档说明了属性动画是如何工作的,让我们来看一看。

First, let’s go over how an animation works with a simple example. Figure 1 depicts a hypothetical object that is animated with its x property, which represents its horizontal location on a screen. The duration of the animation is set to 40 ms and the distance to travel is 40 pixels. Every 10 ms, which is the default frame refresh rate, the object moves horizontally by 10 pixels. At the end of 40ms, the animation stops, and the object ends at horizontal position 40. This is an example of an animation with linear interpolation, meaning the object moves at a constant speed.

Figure 1. Example of a linear animation

首先,来看一个例子,阶段1描述一个假设对象对它的x属性值进行动画处理,x代表它在屏幕上的水平位置。动画间隔设置为40ms,移动的距离为40px。每隔10ms(默认的帧刷新时间),这个对象在水平方向上移动10px。在40ms结束后,这个动画结束,这个对象在水平方向40px处。这个例子使用了线性插值器,代表着这个对象以常数速度移动。

You can also specify animations to have a non-linear interpolation. Figure 2 illustrates a hypothetical object that accelerates at the beginning of the animation, and decelerates at the end of the animation. The object still moves 40 pixels in 40 ms, but non-linearly. In the beginning, this animation accelerates up to the halfway point then decelerates from the halfway point until the end of the animation. As Figure 2 shows, the distance traveled at the beginning and end of the animation is less than in the middle.

Figure 2. Example of a non-linear animation

这是第二个例子,非线性插值器的使用。

你也可以指定动画使用非线性插值器。在例子2中假设对象在动画开始阶段加速,在结束阶段减速。这个对象仍然移动40px和40ms,但是不是线性的。这个动画在前半段路程中加速,并在后半段路程减速。

这是使用非线性插值器的动画,可以看到动画一定的速度可以不是一个固定值。

Let’s take a detailed look at how the important components of the property animation system would calculate animations like the ones illustrated above. Figure 3 depicts how the main classes work with one another.

Figure 3. How animations are calculated

现在来仔细看一看属性动画系统里的重要组件是怎样计算动画的,图片描述了它的主要的类相互工作的方式。

The ValueAnimator object keeps track of your animation’s timing, such as how long the animation has been running, and the current value of the property that it is animating.

The ValueAnimator encapsulates a TimeInterpolator, which defines animation interpolation, and a TypeEvaluator, which defines how to calculate values for the property being animated. For example, in Figure 2, the TimeInterpolator used would be AccelerateDecelerateInterpolator and the TypeEvaluator would be IntEvaluator.

To start an animation, create a ValueAnimator and give it the starting and ending values for the property that you want to animate, along with the duration of the animation. When you call start() the animation begins. During the whole animation, the ValueAnimator calculates an elapsed fraction between 0 and 1, based on the duration of the animation and how much time has elapsed. The elapsed fraction represents the percentage of time that the animation has completed, 0 meaning 0% and 1 meaning 100%. For example, in Figure 1, the elapsed fraction at t = 10 ms would be .25 because the total duration is t = 40 ms.

When the ValueAnimator is done calculating an elapsed fraction, it calls the TimeInterpolator that is currently set, to calculate an interpolated fraction. An interpolated fraction maps the elapsed fraction to a new fraction that takes into account the time interpolation that is set. For example, in Figure 2, because the animation slowly accelerates, the interpolated fraction, about .15, is less than the elapsed fraction, .25, at t = 10 ms. In Figure 1, the interpolated fraction is always the same as the elapsed fraction.

When the interpolated fraction is calculated, ValueAnimator calls the appropriate TypeEvaluator, to calculate the value of the property that you are animating, based on the interpolated fraction, the starting value, and the ending value of the animation. For example, in Figure 2, the interpolated fraction was .15 at t = 10 ms, so the value for the property at that time would be .15 X (40 - 0), or 6.

The com.example.android.apis.animation package in the API Demos sample project provides many examples on how to use the property animation system.

ValueAnimator对象保持追踪你的动画的timing,例如动画运行了多久,amimating的属性值现在是多少。

ValueAnimator封装了一个TimeInterpolator和一个TypeEvaluator,前者定义了动画插值,后者定义了如何计算animate的属性的值。举例说明,在图2中,TimeInterpolator的实现是AccelerateDecelerateInterpolator,TypeEvaluator的实现是IntEvaluator。

为了开始一个动画,创建一个ValueAnimator并且给它你要animate的属性的初始值和结束值。当你调用start函数时,动画开启,在整个动画期间,基于动画持续时间和已经运行的时间,ValueAnimator从0到1计算运行时的值。这个运行时的值代表动画已经执行的时间所占的总时间百分比。

当ValueAnimator计算完运行时值,它会调用当前设置的TimeInterpolator来计算插值,一个插值映射到运行值作为一个新的值。例如在图2中,因为动画缓慢的加速,在10ms时,插值,大概0.15,小于运行时值0.25。在图1里,插值总是等于运行时值。

当计算插值时,ValueAnimator调用合适的TypeEvaluator。在图2中,插值在10ms时等于0.15,所以那时的属性值为0.15*(40-0),也就是6。

通过这个计算,我们可以发现属性值的计算方法,当前的属性值=插值*(end-begin),这个公式不涉及到运行时值。

绕了这么一大堆,我自己都感觉一头雾水,这些东西需要简明的叙述一遍:

首先,使用属性动画的直接类是ValueAnimator和ObjectAnimator(继承自ValueAnimator)。而它们内部的实现依赖于Interpolator(计算插值)和TypeEvaluator(计算属性值)。Interpolator决定了动画的执行进度,它输出一个0到1之间的小数,比如0.5就代表动画已经执行了一半,而具体到我们使用,我们可以自己实现这个类定义什么是动画的进度、动画的进度怎么计算,比如如果是一个平移,我们以平移对象的移动距离和总距离比来决定当前动画的进度。这个进度值随后会输出给TypeEvaluator,TypeEvaluator根据进度来决定如何计算属性值,这个属性值就是动画的key值,比如一个旋转动画里这个值是旋转的角度,最后这个TypeEvaluator的输出结果就决定了动画的效果。

使用属性动画最重要的就是搞清楚Interpolator和TypeEvaluator到底是干什么的。

接下来我们来自己完成简单的demo。

首先是ValueAnimator:

先来看看最后的效果,绘制一个矩形,并让它从开始位置移动到结束位置。

valueAnimation

为了示意自定义,我没有使用sdk提供的Rectangular类,自己定义了一个,很简单。

1
2
3
4
5
6
7
8
9
10
11
12
13
14
15
16
17
18
19
20
21
22
23
24
25
26
27
28
29
30
31
32
33
34
35
36
37
38
39
40
41
42
43
44
45
46
47
48
49
50
51
52
53
54
55
56
57
package com.zuliangwang.learnanimation;

import android.graphics.Point;

/**
* Created by zuliangwang on 16/11/26.
*/


public class Rectangular {
// Point left = new Point();
// Point right = new Point();
// Point
float left;
float right;
float top;
float bottom;

public Rectangular(float left, float right, float top, float bottom) {
this.left = left;
this.right = right;
this.top = top;
this.bottom = bottom;
}


public float getLeft() {
return left;
}

public void setLeft(float left) {
this.left = left;
}

public float getRight() {
return right;
}

public void setRight(float right) {
this.right = right;
}

public float getTop() {
return top;
}

public void setTop(float top) {
this.top = top;
}

public float getBottom() {
return bottom;
}

public void setBottom(float bottom) {
this.bottom = bottom;
}
}

自定义TypeEvaluator,根据动画进度来决定现在矩形的位置。

1
2
3
4
5
6
7
8
9
10
11
12
13
14
15
16
17
18
19
20
21
22
23
package com.zuliangwang.learnanimation;

import android.animation.TypeEvaluator;
import android.graphics.Point;

/**
* Created by zuliangwang on 16/11/26.
*/


public class TestTypeEvaluator implements TypeEvaluator<Rectangular> {

@Override
public Rectangular evaluate(float fraction, Rectangular startValue, Rectangular endValue) {
float top =startValue.top + fraction*(endValue.getTop()-startValue.getTop());
float bottom = startValue.bottom + fraction*(endValue.getBottom()-startValue.getBottom());
float left = startValue.left + fraction*(endValue.getLeft()-startValue.getLeft());
float right = startValue.right + fraction*(endValue.getRight()-startValue.getRight());

Rectangular rectangular = new Rectangular(left,right,top,bottom);

return rectangular;
}
}

最后是自定义这个矩形view:

1
2
3
4
5
6
7
8
9
10
11
12
13
14
15
16
17
18
19
20
21
22
23
24
25
26
27
28
29
30
31
32
33
34
35
36
37
38
39
40
41
42
43
44
45
46
47
48
49
50
51
52
53
54
55
56
57
58
59
60
package com.zuliangwang.learnanimation;

import android.animation.ValueAnimator;
import android.content.Context;
import android.graphics.Canvas;
import android.graphics.Color;
import android.graphics.Paint;
import android.util.AttributeSet;
import android.view.View;

/**
* Created by zuliangwang on 16/11/26.
*/


public class MyAnimObject extends View {
Rectangular mRectangular;
Rectangular beginRectangular;
Rectangular endRectangualar;
Paint mPaint;
public MyAnimObject(Context context) {
super(context);
mPaint = new Paint();
mPaint.setColor(Color.BLUE);
}

public MyAnimObject(Context context, AttributeSet attrs) {
super(context, attrs);
}

public MyAnimObject(Context context, AttributeSet attrs, int defStyleAttr) {
super(context, attrs, defStyleAttr);
}


@Override
protected void onDraw(Canvas canvas) {
canvas.drawRect(mRectangular.left,mRectangular.top,mRectangular.right,mRectangular.bottom,mPaint);
}

public void startAnimation(){
beginRectangular = new Rectangular(0,300,50,350);
endRectangualar = new Rectangular(200,500,150,450);


ValueAnimator valueAnimator = ValueAnimator.ofObject(new TestTypeEvaluator(),beginRectangular,endRectangualar);
valueAnimator.setRepeatCount(10);
valueAnimator.addUpdateListener(new ValueAnimator.AnimatorUpdateListener() {
@Override
public void onAnimationUpdate(ValueAnimator animation) {
mRectangular = (Rectangular) animation.getAnimatedValue();
invalidate();
}
});

valueAnimator.setDuration(3000);
valueAnimator.start();
}
}

重点是这里的UpdateListener,这里是实现这个动画的关键。

简要说明一下逻辑:

ValueAimator其实是一个很简单的数据计算工具,它不像ObjectAnimator那样可以直接实现对view的操作,因此实际上我们使用ValueAnimator要自己实现的内容会更多,在这里ValueAnimator每次计算完当前帧的结果就会回调update监听器,我们在监听器里重新设置矩形的坐标值并手动调用invalidate重绘矩形。

ObjectAnimator相比ValueAnimator其实就是把手动设置Update这一步省略了而已,你只要输入属性值,它会自动去实现类似Update这种逻辑。

我们再来看一个更简单的例子:

1
2
3
4
5
6
7
8
9
10
11
12
13
14
15
16
17
18
19
20
21
22
23
24
25
26
27
28
29
30
31
32
33
34
35
36
37
38
39
40
41
42
43
44
package com.zuliangwang.learnanimation;

import android.animation.Animator;
import android.animation.ObjectAnimator;
import android.animation.ValueAnimator;
import android.graphics.drawable.AnimationDrawable;
import android.support.v7.app.AppCompatActivity;
import android.os.Bundle;
import android.util.Log;
import android.view.View;
import android.view.animation.Animation;
import android.view.animation.AnimationSet;
import android.view.animation.AnimationUtils;
import android.widget.Button;
import android.widget.ImageView;
import android.widget.LinearLayout;
import android.widget.TextView;

public class MainActivity extends AppCompatActivity {

private String TAG = "Animation";

@Override
protected void onCreate(Bundle savedInstanceState) {
super.onCreate(savedInstanceState);
setContentView(R.layout.activity_main);


final TextView textView = (TextView) findViewById(R.id.test_text);

float begin=0;
float end=360;
ValueAnimator valueAnimator = ValueAnimator.ofFloat(begin,end);
valueAnimator.setDuration(3000);
valueAnimator.addUpdateListener(new ValueAnimator.AnimatorUpdateListener() {
@Override
public void onAnimationUpdate(ValueAnimator animation) {
Log.d(TAG,(Float)animation.getAnimatedValue()+"");
textView.setRotation((Float) animation.getAnimatedValue());
}
});
valueAnimator.start();
}
}

这里就是旋转一个TextView,在这里很明显的可以看到ValueAnimator仅仅只是一个计算工具,你可能会问这里为什么没有调用invalidate(),这是因为sdk里的view和我们自己手动定义的view不同,在这个setRotation方法里它会主动去调用invalidate()

接下来来看ObjectAnimator:

1
2
3
4
5
6
7
8
9
10
11
12
13
14
15
16
17
18
19
20
21
22
23
24
25
26
27
28
29
30
31
32
33
34
35
36
37
38
39
40
41
42
43
44
45
46
47
48
49
package com.zuliangwang.learnanimation;

import android.animation.Animator;
import android.animation.ObjectAnimator;
import android.animation.ValueAnimator;
import android.graphics.drawable.AnimationDrawable;
import android.support.v7.app.AppCompatActivity;
import android.os.Bundle;
import android.util.Log;
import android.view.View;
import android.view.animation.Animation;
import android.view.animation.AnimationSet;
import android.view.animation.AnimationUtils;
import android.widget.Button;
import android.widget.ImageView;
import android.widget.LinearLayout;
import android.widget.TextView;

public class MainActivity extends AppCompatActivity {

private String TAG = "Animation";

@Override
protected void onCreate(Bundle savedInstanceState) {
super.onCreate(savedInstanceState);
setContentView(R.layout.activity_main);


final TextView textView = (TextView) findViewById(R.id.test_text);

float begin=0;
float end=360;
// ValueAnimator valueAnimator = ValueAnimator.ofFloat(begin,end);
// valueAnimator.setDuration(3000);
// valueAnimator.addUpdateListener(new ValueAnimator.AnimatorUpdateListener() {
// @Override
// public void onAnimationUpdate(ValueAnimator animation) {
// Log.d(TAG,(Float)animation.getAnimatedValue()+"");
// textView.setRotation((Float) animation.getAnimatedValue());
// textView.invalidate();
// }
// });
// valueAnimator.start();

ObjectAnimator objectAnimator = ObjectAnimator.ofFloat(textView,"rotation",begin,end);
objectAnimator.setDuration(3000);
objectAnimator.start();
}
}

看到了没有,这三行代码和上面的ValueAnimator完成的功能是完全相同的。ObjectAnimator做了一个什么工作呢?它根据我们输入的对象和属性名去这个对象里找这个属性,然后每次更新时去更新这个属性值,其实就是上面的那一回事。

需要注意的是ObjectAnimator搜寻更新属性值的方法:非常的简单粗暴,传入对象.setXXX()和传入对象.getXXX(),因此你如果要使用ObjectAnimator,你传入的属性值必须有get和set方法。如果没有,那你只能另想办法了。

Animator还有一个子类AnimatorSet,这个类我不想讲了,如果搞懂了前面的ValueAnimator和ObjectAnimator,那使用这个集合是非常简单的。

动画的分析到这里就结束了,属性动画更深入的用法还是在生产环境上再讨论。

参考网站:

Android官方网站

https://developer.android.com/guide/topics/graphics/view-animation.html

博客:

http://blog.csdn.net/yanbober/article/details/46481171

http://blog.csdn.net/sinyu890807/article/details/44171115

View、Window、Activity的关系

一个Android应用的视图是如何呈现出来呢?

新手可能因为没有接触过Window而认为是Activity或者是View,我在刚开始学习Android 的时候就认为一个Activity就是一个画板一样的东西,但是实际上,视图的真正代表类是Window。所谓的视图代表类的意思就是指真正的绘制工作的实现类。也就是说,Activity本身不负责绘制UI,它是一个中转控制类,我们把View交给他,他负责让Window去绘制我们给它的View,从而让Android呈现出视图,如果一个Activity没有Window,那么它的作用就和Service类似了。

按照这个思路来想,很显然的,一个Acitivity必然持有一个Window的引用以及一套View的控制机制。

Window具体的实现和内容我们不谈,这些东西涉及到底层的真正的绘图的OpenGL这样的玩意,它必然是由C++来实现的。

那么我们的重点就是View的这套控制机制,Activity是如何控制我们交给它的View的?很多书里都都会谈到ViewRoot和DecorView这些东西,但是不明确刚才说的前提的情况下,说了半天也不知道是在干什么。

先简单的说一下Window和Activity:

(1)每一个Activity实例里都存在一个Window实例,在Activity被ActivityThread创建时调用Activity的attch方法将Window实例与Activity实例绑定。

(2)Acitivity调用setContentView方法实际上调用的是Window的setContentView方法。

接下来开始View:

先搞清楚ViewRoot和DecorView两者。

ViewRoot准确的说这个类是ViewRootImpl,它是WindowManagerService和DecorView的连接者,从这个角度来看,它可以说是ViewRoot的更上一层,但是ViewRoot本身没有继承View,它不在View树这个层次里。我们可以把ViewRoot理解为Activity管理View树的中介,事实上,所有的触摸事件、刷新事件都是通过ViewRoot传递给View树。

而DecorView就是View树的顶层了,它继承自FrameLayout,一个Acitivity里的所有View都在这个Decor的下面,DecorView通常包含一个LinearLayout,它的子view是上下两个部分(根据版本不同有区别)。

常用ADB命令总结

1.连接命令

adb -d 直接在唯一连接的实体机上操作

adb -e 直接在唯一连接的虚拟机上操作

adb -s \ 在指定设备号上的手机上操作(可以是虚拟机或者是实体机)

adb -a 在所有机器上操作

adb devices 查看当前连接的所有设备的设备号

adb connect 使用TCP/IP协议连接设备

adb disconnect 断开连接

2.设备命令

adb push 复制文件或是目录到设备上

adb pull 从目标设备上复制文件或目录到本机上

adb sync ???

adb shell 打开设备的shell

adb emu ??

adb logcat 查看目标设备的log

adb install 安装apk

adb uninstall 卸载apk

使用命令时连接和设备命令要一起使用

如安装一个当前目录下的apk到目标设备下

adb -s 设备号 install apkName.apk

另补充一个比较实用的命令:

有时候在Android Studio上会碰到找不到设备的情况,通常通过重新启动ADB就可以解决这个问题,重启的命令是

adb kill-serveradb start-server